How to Profile Epson Printers for Accurate Color Output
By InkProducts Inc
Proper printer profiling is essential to achieving accurate, vibrant prints—whether you're printing edible images for cakes, high-resolution photos, or sublimation transfers for mugs, fabrics, or signage. While professional ICC profiling tools offer the highest precision, Epson's basic software gives users a helpful starting point.
This article explains how to optimize color using Epson’s driver settings and free utilities, and how to get the best results with InkProducts edible, photo, and sublimation inks.
Why Epson's Basic Software Matters
Epson’s standard driver and utilities are installed automatically with most printers. They provide important tools to:
-
Manually adjust color balance
-
Control saturation and contrast
-
Disable built-in color correction
-
Save custom settings for repeat jobs
While Epson doesn’t allow full ICC profile creation through its basic software, it still provides effective manual control, which is especially useful when using third-party inks from InkProducts Inc.
Why Profiling is Essential with InkProducts Inks
Epson’s factory settings are built around Epson’s original ink formulations. When switching to:
-
Edible ink from InkProducts for cake images
-
Sublimation ink from InkProducts for heat transfer printing
-
Refillable photo dye or pigment inks for general printing
…the factory color settings often fall short.
You may notice:
-
Dull or muted tones
-
Skin tones looking too red or too yellow
-
Colors not matching your screen or design
Color correction via Epson’s driver can resolve many of these issues—without needing expensive equipment.
Step-by-Step: Optimizing Epson Output Using Basic Tools
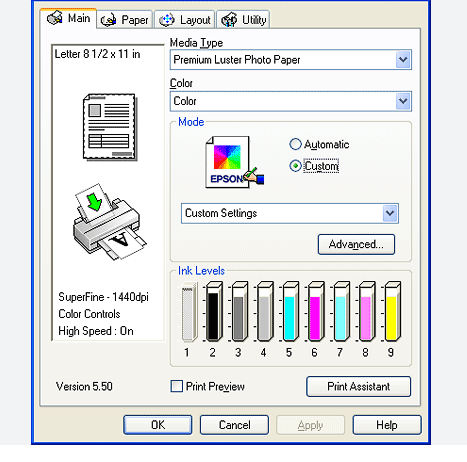
1. Open the Epson Driver or Print Dialog
When printing from a program like Photoshop, Word, or a photo editor, click on:
-
File > Print
-
Choose your Epson printer
-
Click Preferences, Properties, or Printer Settings
You'll enter the Epson driver interface where most of the color adjustments happen.
2. Choose the Right Media Type
Select a paper type that matches the surface you're printing on:
-
Photo paper: “Premium Glossy Photo” or “Luster”
-
Edible frosting sheets: “Matte Paper – Heavyweight”
-
Sublimation paper: “Plain Paper” or “Presentation Matte Paper” (depends on brand)
📌 Using the right media setting ensures the printer lays down the proper amount of ink.
3. Set Print Quality to High
To ensure sharp images and strong color density:
-
Set Print Quality to High or Best Photo
This is especially important for edible ink to avoid banding, and for sublimation to transfer full color detail during heat press.
4. Access the Color Adjustment Menu
In the driver, look for “More Options”, then under Color Correction, choose:
-
Custom > Advanced
-
Select “Color Controls”
Now you can manually adjust:
-
Saturation
-
Brightness
-
Contrast
-
Color Balance (Cyan, Magenta, Yellow sliders)
5. Manual Color Adjustments by Ink Type
Depending on which InkProducts ink you're using, your adjustments may vary:
For Edible Ink:
-
Reduce Yellow if skin tones look too orange
-
Decrease Magenta slightly if reds dominate
-
Boost Brightness slightly for lighter frosting sheets
📌 Always let frosting sheets dry fully before judging final color (1–2 hours).
For Sublimation Ink:
-
Slightly increase Saturation to improve post-transfer vibrancy
-
Adjust Contrast to avoid soft blacks
-
Reduce Yellow if prints transfer with a greenish hue
📌 Remember: colors look dull on paper pre-press. Judge only after heat transfer.
For Photo Ink (Pigment/Dye):
-
Use PhotoEnhance mode for quick corrections (optional)
-
Increase Saturation for vibrant prints
-
Use Neutral or Adobe RGB under Color Mode for accurate tones
6. Disable Double Color Management (When Needed)
If you're printing from Photoshop or another program with color control:
-
Set Photoshop or your design software to Manage Colors
-
In the Epson driver, select No Color Adjustment
This prevents Epson’s driver from altering the profile already applied by your software.

7. Save Settings as a Preset
Once you've dialed in good settings for your edible, sublimation, or photo printing:
-
Click Add/Save Settings in the driver
-
Name the preset, e.g., “InkProducts Edible High Quality” or “Sublimation Matte Vivid”
This ensures you won’t have to remember manual settings each time.
How to Improve Results Further
While Epson’s driver provides decent control, you can take quality a step further with:
-
Monitor calibration (for soft-proofing)
-
Photoshop soft proofing using a simulated profile if available
Special Considerations by Ink Type
✅ Edible Ink Tips (InkProducts Edible Systems)
-
Always print on the frosting or wafer side of the sheet
-
Handle sheets with clean, dry hands
-
Use Matte settings to reduce ink oversaturation
-
Let prints air dry before touching or applying to cakes
✅ Sublimation Ink Tips (InkProducts Sublimation Ink)
-
Mirror your image before printing
-
Use consistent temperature, time, and pressure when pressing
-
Perform test prints on scraps to adjust color
-
Remember that pre-pressed sublimation prints appear dull until heat is applied
✅ Photo Printing Tips (InkProducts Dye/Pigment Ink)
-
Use the proper paper setting for the media finish
-
Allow prints to dry before handling
-
Store prints away from direct sunlight for longevity
-
Consider Epson Print Layout (free utility) for advanced photo layouts
Conclusion
Even without advanced profiling equipment, Epson’s basic software provides useful color control tools—especially when printing with InkProducts’ edible, sublimation, or refillable ink systems.
With proper manual adjustment, media type selection, and print quality settings, you can greatly enhance color accuracy across all types of printing:
-
🎂 Edible ink prints with natural skin tones and vibrant cake art
-
🖼️ Photo ink produces sharp, saturated gallery-quality prints
-
🔥 Sublimation ink yields bright, lasting transfers with minimal waste
-
InkProducts does not supply ICC profiles. However, with proper manual adjustments and the right media settings, excellent color output can still be achieved.

